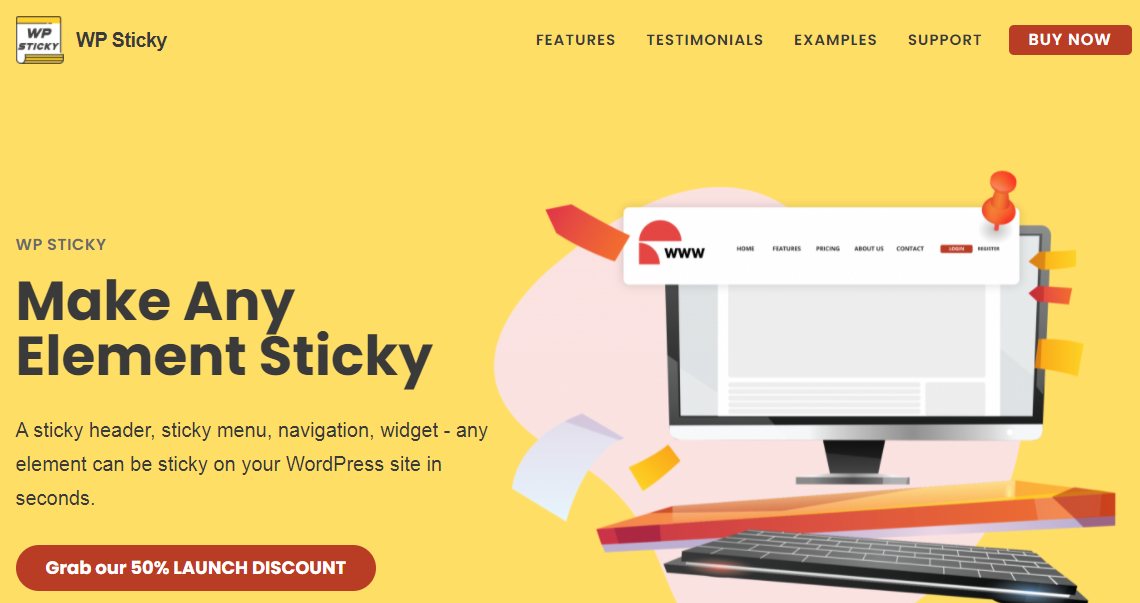
Today, we would like to talk about sticky elements. To be more specific about sticky menus and headers. Further in this article, we will be presenting you with the best plugin on the market, which allows you to create any element of your site into a sticky one.
But before we get to that, we would like to introduce you even more to sticky elements; what they are, what we can use them for, and so on. So, if this intrigues you, keep on reading.
What is a Sticky Element?
A sticky element is any component of your website that you want to be visible at all times while scrolling through it. It means the part you have decided to make sticky will follow the viewers’ moves on your site, making the element accessible with only one click.
The biggest reason why sticky elements are so popular is that they present easy navigation through your site. People do not feel lost while scrolling through your site, resulting in them staying longer and not simply leaving your site due to confusion. Also, this comes in handy, especially for those long sites that have tons of subcategories.
Another reason sticky features are popular is that they can serve as a reminder. As a result, readers will be reminded that there are other parts of your website and that different types of content are available.
Also, the cool thing about sticky elements is that you can insert your company/business logo in the header. This feature ensures that your logo is always visible to the person viewing your site and will make them remember you. And the last advantage of incorporating sticky elements into your site is simply professionalism.
In a way, adding subtle changes like this one is not that huge, but it does add some functionality. Also, it will make your visitors think you have put some time into creating your site and that you have spent time thinking of ways to make their visit more enjoyable.
WP Sticky
Every element can convert into a sticky one, but the header and menu are the most popular. The reason for this is the already mentioned more straightforward navigation. Wouldn’t creating sticker elements without a single word of code be amazing? Well, we would like to present you WP Sticky, which allows you just that.
It is easy to use, but it is also speedy and compatible with any theme, plugin, and so on, which means that creating a sticky element with this plugin and implementing it to your site should not cause any problems with its functionality.
Also, it will not slow it down in any way. It saves you tons of time and nerves, considering it does not require code. However, all you have to do is pick the element you want to make sticky and its position.
Pricing
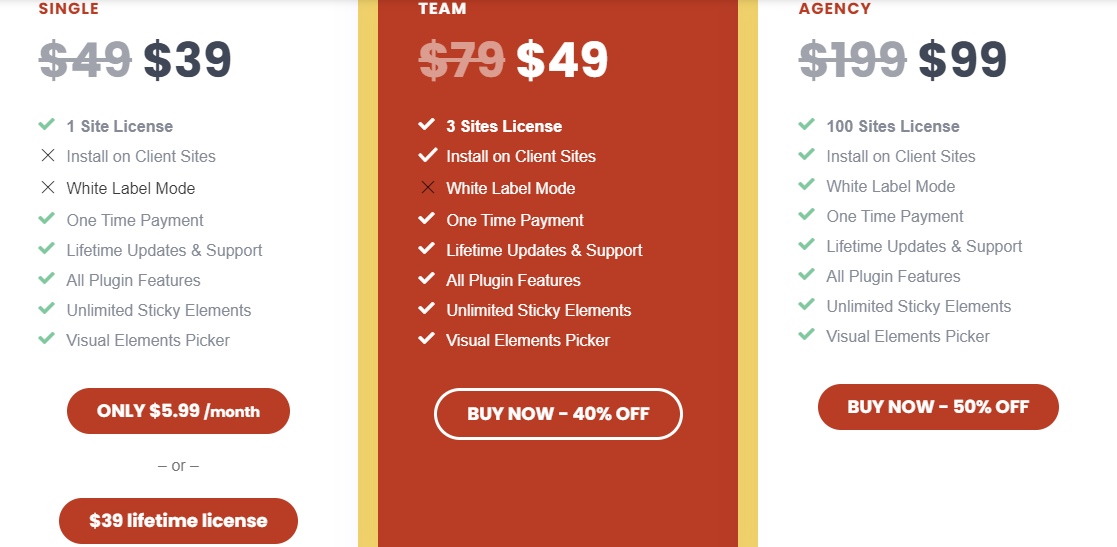
When it comes to pricing, they offer three price plans beginning with the smallest one- “Single,” costing $39. The second plan, called “Team,” costs $49, and the biggest one- “Agency” costs $99. You can choose between annual and monthly payments.
The best part of the plans is that all features are included in all three programs and differ only in the number of site licenses. The smallest one gives you only one, the second one three and the third one 100.
They also give you a 7-day money-back guarantee. So in case that you, for some reason, don’t like the plugin, you can ask for your money back within the first seven days.
It places no restrictions on the number of items you can create. That implies that you have an unlimited number of options. You can always fix them by disabling the plugin, which is as simple as making them persistent.
You can find any additional information regarding their features and possibilities on their website given above. You can also find reviews from other customers and a few sites they offer as examples of what the plugin can accomplish and what it should look like.
How to Create a Sticky Element With WP Sticky
Now let’s talk about the process of creating a sticky element using this plugin. We will give you step-by-step directions that you can follow along to make your element.
You want to start by downloading the plugin on the site, and once you do that, you want to activate it. Further, you will have to open its settings, and in there, you can find the “Add a new sticky element” button. By clicking that, you will be able to start the process of creating a sticky. So let’s go through these simple steps together.
Firstly, you will receive a new menu where you want to start by naming the element, you want to create.
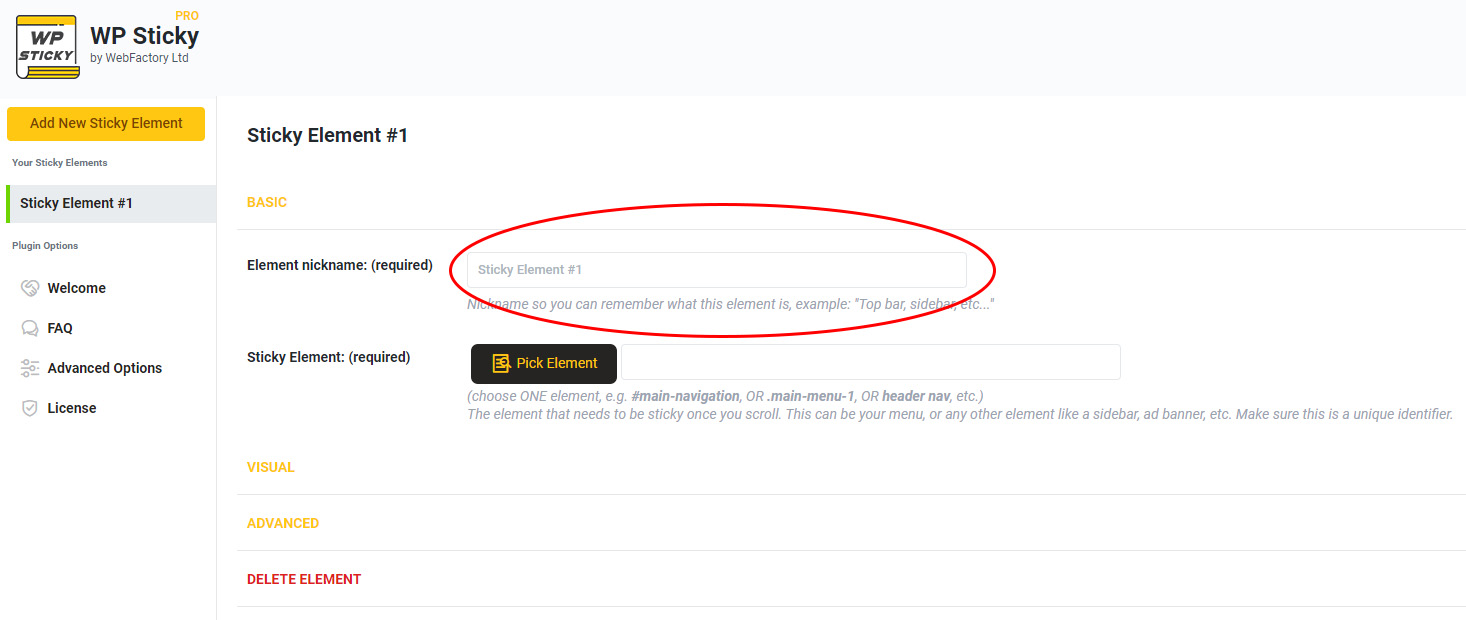
Also, you should make the name of your element by the type of element you are creating (for example, header, menu, picture, and so on). The reason for this is the fact the editing them should be more accessible in the future. After doing so, by clicking the “Choose element” button, you should be able to see a preview of your site.
What makes the element sticky is toggling the “Slide down” button in the Effects category. Here you can click on a specific part of it, making the already given name assigned to that element. So, that is all you have to do to make a sticky.
If you do not need to have that particular element sticky in the future, you can turn off the stickiness by toggling the “Status” button in the upper right corner.
The whole point of creating this plugin is to ease the creation and implementation of sticky elements into your site. However, we must point out that the entire process is simple and does not require special attention.
More Features
Additionally, this is not the only thing that is possible to do with this plugin. There are some additional advanced settings that we would like to present to you.
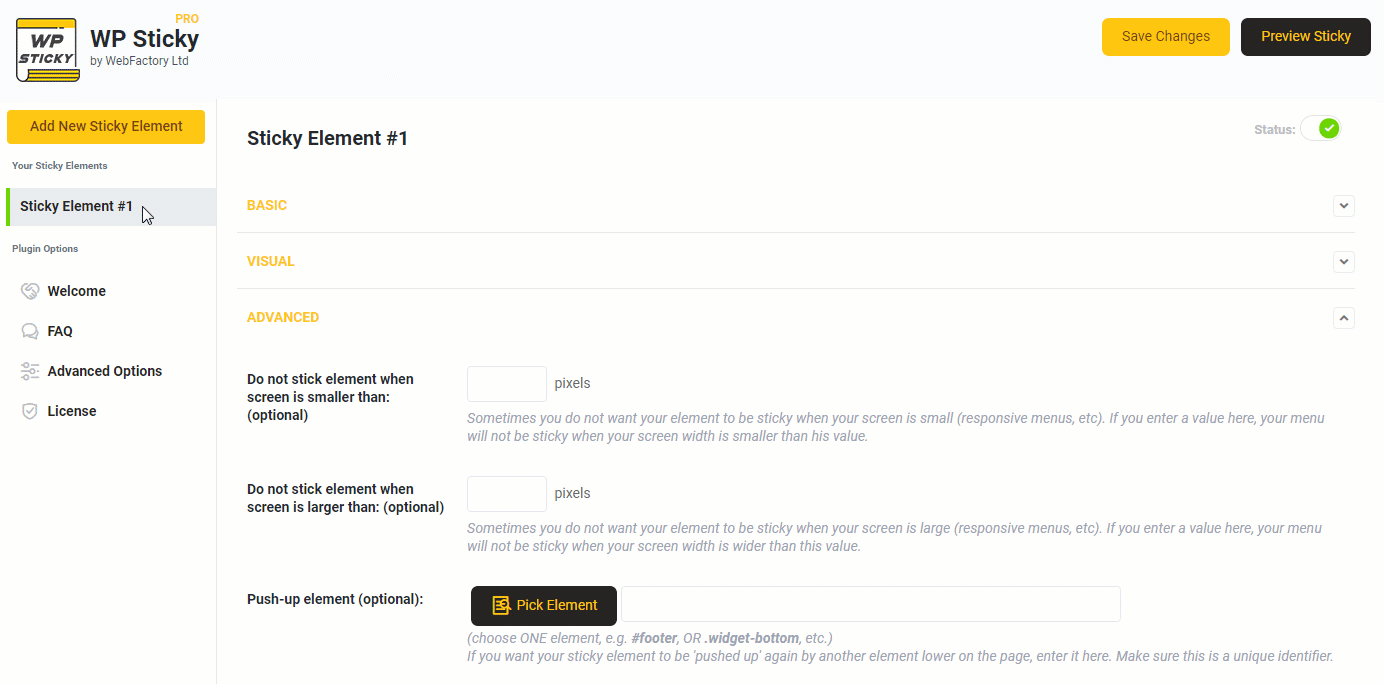
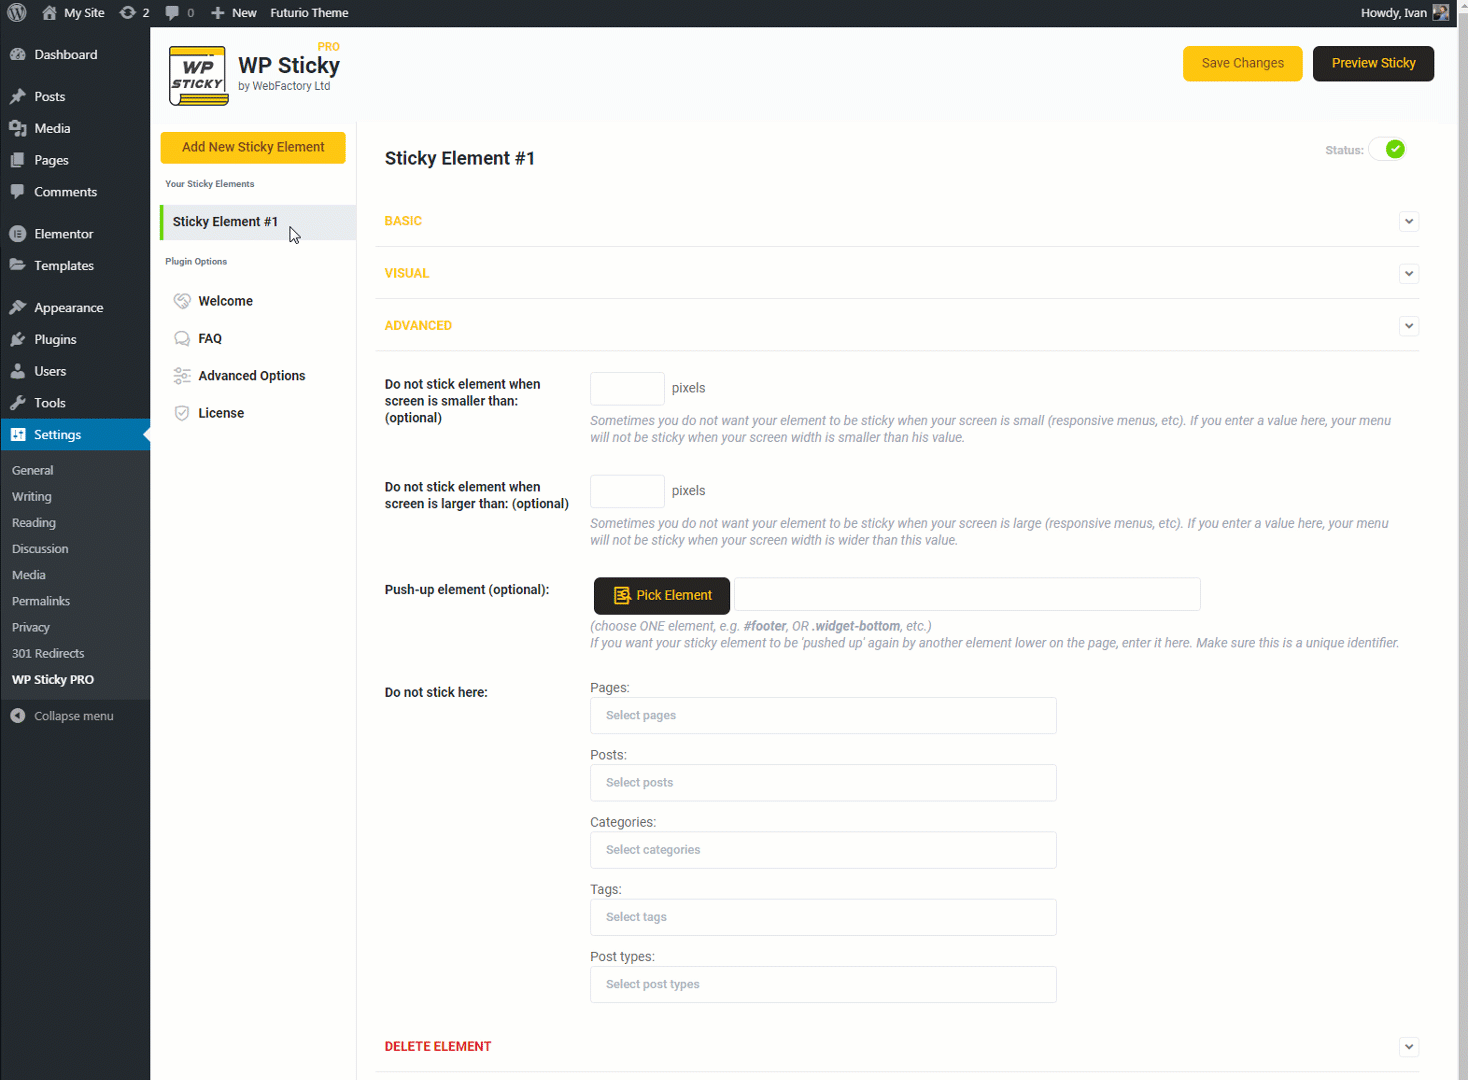
Do not stick when the screen is smaller/larger than X
The first is the “Do not stick when the screen is smaller/larger than X.” You enter the number of pixels in the provided box, and the element you have chosen to be sticky will not be when the number of pixels is below that. This option is significant to consider when visitors may use your site on other devices and not only PCs. Also, you can accomplish the same thing with larger screens.
Do not stick here
This option allows your element not to be sticky when the visitor visits a specific page of your site. So, for example, the sticky header does not necessarily have to be sticky when viewing the contact page, about us page. However, you want it to be sticky on every other page. This option allows you just that.

You can delete a particular element by simply deactivating the plugin. But, you can also achieve the option to delete the element from the plugin with this option entirely.
Push up element
This option allows you to select a specific element that will trigger your sticky and “push” it back to its original position. Also, this means no matter how far down you scroll down on a specific site, the menu will always be sticky and in its place.
But, suppose you decide on your push element to be an image. Then, the sticky will automatically be pushed to its original position when the person scrolls down and reaches the push-up element.
Z-index
The default values are suitable for most of the sites the plugin is used with. However, if you need help declaring what goes over and what goes under, the “Z-index” will help you with that.
When it comes to the visual effect, you can insert some effects like fading in and out, sliding up and down, etc. There is even the option to quickly edit the element’s opacity based on its importance and be eye-pleasing.
Conclusion
We have talked about everything that WP Sticky offers. We highly recommend giving it a try since it does not cost that much and brings excellent use to your site. We understand if you are a complete beginner when it comes to this.
You might not want to spend that much money, but we can say with certainty that this tool is worth giving a try. You can find any additional information on the official website.
We have also covered all of the benefits a sticky header can bring to you. It is such a small change that can get you more traffic and keep it on your site.
We hope you have found this article helpful and found all the information you came here looking for. If you have some doubts about incorporating sticky elements, you can always do some additional research online. But we are sure your decision will be favorable.